Connect with us

Ingredients

Make the Best Home Made Garlic

Published

on

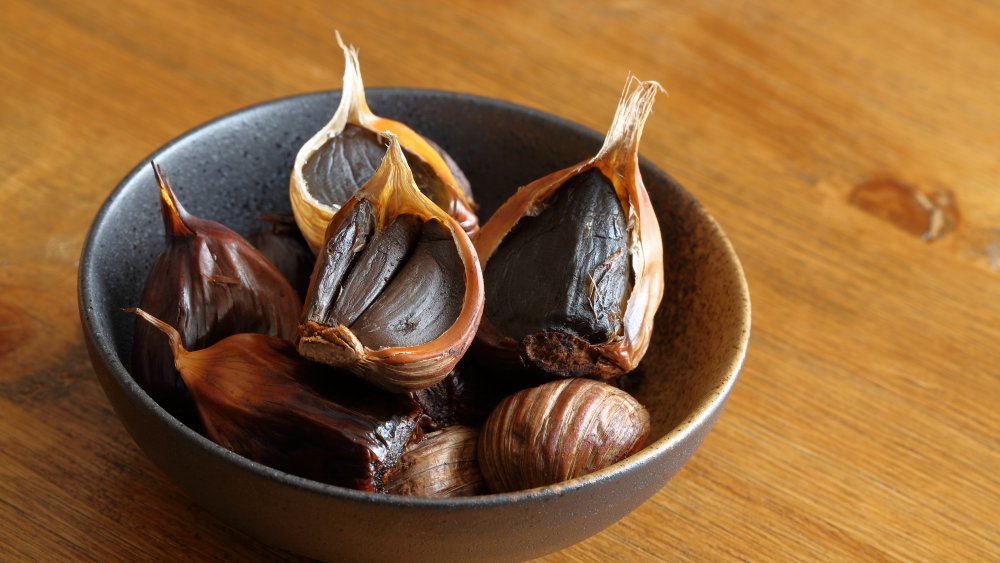
Black garlic turns black after it is allowed to age over time under controlled conditions that bring about a Maillard reaction. 

It is this chemical reaction between reducing sugars and amino acids that gives black garlic that dark color and distinctive flavor.

The flesh of black garlic has a flavor that is at once both distinctly savory and slightly sweet. The resultant flavor and texture is similar to that of molasses. 

On the edges, black garlic feels tender yet dry, but the center is moist with a slightly gelatinous feel.

Black garlic has gained immense popularity over the last few years as a restaurant ingredient, although Asians have been eating it for centuries. 

Black garlic is nutritious, rich in immune-boosting nutrients, such as phytonutrients, according to medical experts. 

Dehydrators are a fairly popular tool for making home-made black garlic. But most people don’t own one. I don’t own one myself, either. 

Most of the techniques I picked up from YouTube videos required me to make a ton of black garlic heads at a go. It was always too much for me to possibly consume at once, even with my garlic habit. 

I was desperate to find a way to make just a few black garlic heads and without having to splurge on new kitchen equipment. 

Instant Pot Black Garlic 

When I discovered the Instant Pot technique, I was smitten with it. Of course I was enamored by the idea of making black garlic within a day instead of a month. 

It was a YouTube video of course that came to my rescue. I learned that I could place peeled cloves of garlic inside a Mason jar, add the jar and a cup of water inside the Instant Pot, and then leave it cooking on high for the next 6-8 hours. 

Six hours later, I was opened the Instant Pot to find somewhat sooty but not quite black garlic. The insides were just the same as those of raw garlic and not squishy at all.

At first I thought it was the six hour cooking time, so I tried again. This time I gave it the full eight hours.  Even then, the texture was not soft and gelatinous like I wanted. The flavor too was a definite miss. Nothing like the black garlic I got from the store. 

At this point, I was ready to move on to my next experiment: Slow Cooker Black Garlic.

Slow Cooker Black Garlic

Emerged from my failed experiment older and wiser, I went back to good old YouTube for inspiration for my next experiment. After a whole lot of YouTubing, I gathered that I was supposed to place the garlic heads inside a turkey basting bag and cooking it on low heat on the slow cooker and then leaving it for a week, checking on it, then cooking it for another week before my black garlic is ready. 

It is a miracle that I even finished the first week of the damned experiment. By day three, the smell of garlic was so intense that I had to quarantine the slow cooker in the bathroom to avoid permanently marking my home with an indelible smell of garlic. 

At the end of the week, the poor basting bag was melted, and the garlic was transformed into coal. Completely charred and lacking in moisture. To call it a failure would be an understatement. 

I tested the temperature of the Crock-Pot after the whole thing was over and at was 350°F at the lowest setting. The failure of the experiment was no longer a mystery. 

I decided to restart the experiment, this time turning it off and on to keep the temperature from going too high or too low. 

It took effort to do this, and three days later, I was rewarded with a second batch of charred garlic. 

My final conclusion was that this method only works with a slow cooker whose lowest temperature setting is between 120 and 160°F.

I was now about to give up, but I still had not tried my rice cooker. So off I went. 

Rice Cooker Black Garlic

I approached my third and final experiment armed with the lessons learned from my work with the slow cooker. 

I tested my rice cooker’s temperature first before putting in my garlic cloves. I was working with a trusted 15-year-old rice cooker. My Zojirushi rice cooker bottoms out at 150°F which is higher than 120°F but certainly not as high as 350°F. I would have to carry out a daily temperature check. 

I started with two heads of garlic which I wrapped in foil before dunking into the rice cooker. The rice cooker was also sealed in foil from the top to keep the garlic from losing moisture. 

Two days later, I checked on my garlic heads and loved how well they were doing. They were visibly darker, though not as dark as they needed to be. I did sadly, cause the garlic to lose much of its moisture.

By the sixth day, my garlic was almost black and thankfully not as dry as I expected. Day nine was the D-Day. I removed my garlic heads, skinned them and was delighted to discover a proper clove of black garlic. 

The first thing I noticed was the aroma which was very similar to store-bought garlic. Then I cut it in two and discovered a gelatinous but stable texture. It was just what I wanted. 

It was now time for the taste test.  I now tasted the garlic and discovered that it was almost perfect. The ‘almost’ meaning that it was a little too dry. 

I figure if I keep them covered throughout the cooking process and pull them out on Day 8 instead of Day 9, I will probably end up with perfect black garlic cloves. 

I had achieved what I wanted. I had a reasonably sized batch of homemade black garlic ready without having to wait a whole two weeks or purchase any additional kitchen equipment. 

My trusted old rice cooker was good enough. My two prior experiments were more than worth it. The milder flavors were pleasant. This method for preparing the best homemade garlic is perfect for black garlic lovers. People who rarely use black garlic can settle for store-bought garlic. 

Continue Reading

Ingredients

The Future of Flavors and Ingredients: A Glimpse into Tomorrow’s Kitchens

Published

on

By

In the dynamic realm of food and beverage, the IFT FIRST Food Expo stands as a beacon of innovation, unveiling trends that are reshaping our culinary experiences. Let’s delve into the top five trends that are setting the stage for a transformative future in our kitchens and dining tables.

1. Holistic Health and Wellness: A Culinary Revolution

The concept of health and wellness in food has evolved to encompass mental and emotional well-being, alongside physical health. A key trend at the expo was the focus on sugar reduction and personalization in food products. Cargill’s innovative EverSweet + ClearFlo combines a stevia sweetener with a natural flavor, enhancing flavor modification and solubility. Similarly, Sweegen introduced a new liquid stevia sweetener, aligning with consumer trends for easier manufacturing integration.

Personalized health and nutrition have become more holistic, with consumers seeking tailored food and beverage options. This trend is about understanding individual health and happiness needs, a challenge that food companies are increasingly eager to meet.

2. From Clean to Clear Labels: The Era of Transparency

The clean label movement has evolved into a demand for clear labels, with consumers expecting complete transparency about their food’s ingredients. This shift is exemplified by Prosur’s emphasis on clear labeling in its functional ingredients derived from natural vegetable and fruit extracts. Similarly, Blue California has developed an alternative to titanium dioxide, reflecting a growing concern for environmental impact and regulatory compliance.

3. Multifunctional Ingredients: The Functional Powerhouses

Food and beverage manufacturers are increasingly seeking ingredients that deliver multiple functional attributes. ADM’s research on consumer interest in probiotics led to the development of products like the tomato masala biotic snack bite, combining plant protein, prebiotics, probiotics, and postbiotics. Additionally, Hilmar Cheese Company demonstrated how whey protein concentrate can replace whole eggs in certain formulations, highlighting the multifunctional nature of ingredients.

4. Sustainability: The Core of Future Innovations

Sustainability remains a key driver in food and beverage innovation. Ingredients upcycled from food waste, like Ocean Spray’s Cranberry Seeds, add natural color and nutrition to various foods. Lemnature Aquafarms introduced nutritional powders created using a sustainable process with the lemnaceae plant, underscoring the industry’s commitment to sustainability.

5. Plant-Based Power-Up: Meeting the Demands of a Diverse Demographic

The plant-based eating trend has expanded significantly. BENEO’s new faba bean ingredients cater to the growing flexitarian population, offering texture improvement and protein enrichment in vegetarian and meat alternatives. MYCO Technology’s FermentIQ Protein, made by fermenting pea protein with shiitake mushroom mycelium, is another innovative approach, enhancing flavor, aroma, and digestibility.

In conclusion, the trends showcased at the IFT FIRST Food Expo reflect a dynamic industry that is responsive to consumer demands for health, wellness, transparency, functionality, sustainability, and plant-based options. As these trends continue to evolve, they will undoubtedly shape the future of food and beverage, offering exciting possibilities for both consumers and manufacturers.

Continue Reading

Ingredients

Transforming a Tough Cut: The Art of Tenderizing Meat

Published

on

By

In the culinary world, the transformation of a tough cut of meat into a succulent dish is akin to alchemy. It’s a process that requires not just skill and patience, but also a deep understanding of the science behind meat tenderness. For home cooks and chefs alike, the quest for tenderness is a journey worth taking, as it can turn even the most economical cuts into a feast for the senses.

The Challenge of Toughness

Tough cuts of meat, such as chuck roast, brisket, hanger steak, and flank steak, are often overlooked in favor of their leaner, more tender counterparts. However, these cuts offer deep flavors that are unrivaled, provided they are prepared with care. The challenge lies in breaking down the proteins and connective tissues that contribute to their toughness.

The Tenderizing Toolbox

  1. Pounding: A Physical Approach
    • Pounding meat is one of the simplest methods to tenderize. By using a mallet or even everyday kitchen tools like a rolling pin, cooks can physically break down the fibers of the meat. This method is not only effective but also offers an immediate solution to the toughness dilemma.
  2. Salting: The Power of Osmosis
    • Salting is a technique that goes beyond seasoning. It involves coating the meat with a generous layer of salt to break down proteins, a process that can make even choice cuts more tender. The key is to salt the meat about an hour before cooking, then rinse and pat dry before it hits the pan.
  3. Acidic Marinades: Chemical Tenderization
    • Marinades with acidic components such as vinegar, citrus juice, or wine can tenderize the surface of the meat. This method is particularly suited for thinner cuts, where the acid can effectively soften the muscle fibers, infusing the meat with flavor and tenderness.
  4. Enzymatic Magic: Fruits as Tenderizers
    • Fruits like kiwi, papaya, and pineapple contain natural enzymes that can break down tough meat fibers. Kiwi, with its neutral taste, is an excellent choice for a marinade base. However, moderation is key, as over-marination can lead to a mushy texture.
  5. Scoring: Strategic Cuts
    • Scoring involves making shallow cuts against the grain of the meat. This technique can help in two ways: it allows marinades to penetrate more deeply and also interrupts the muscle fibers, resulting in a more tender bite.
  6. Slow Cooking: Time and Temperature
    • Slow cooking is perhaps the most transformative method for tough cuts. By cooking at low temperatures for extended periods, the collagen within the meat breaks down into gelatin, yielding tender, juicy meat that falls apart with the touch of a fork.

The Science of Softening

The science of tenderizing meat is rooted in understanding its composition. Muscle fibers and connective tissues, primarily collagen, are the main contributors to toughness. The methods mentioned above each tackle these components in different ways. Pounding and scoring are mechanical methods that physically alter the structure of the meat. Salting and acidic marinades use chemical reactions to break down protein structures. Enzymatic tenderizers and slow cooking utilize biological and thermal reactions to transform tough collagen into soft gelatin.

The Culinary Perspective

From a culinary standpoint, tenderizing meat is not just about making it easier to eat; it’s about enhancing flavor and texture. Each method of tenderization brings something unique to the table. For instance, a well-salted piece of meat not only becomes tender but also retains moisture better during cooking. Acidic marinades add a tangy dimension to the dish, while enzymatic tenderizers can introduce subtle fruity notes.

Recipes and Recommendations

For those eager to put these methods into practice, there are countless recipes that showcase the potential of well-tenderized meat. Slow-cooked brisket, marinated flank steak, and pounded chicken cutlets are just a few examples of how a tough cut can become the star of the dinner table.

Conclusion

The art of tenderizing meat is a testament to the creativity and resourcefulness of cooks throughout history. By understanding and applying these methods, anyone can turn a tough cut into a tender, flavorful dish. It’s a culinary transformation that not only saves money but also elevates the dining experience, proving that with the right techniques, even the most humble ingredients can be turned into a gourmet delight.

In the end, the journey from tough to tender is one of exploration and experimentation. It’s about discovering the potential in the overlooked and transforming the ordinary into the extraordinary. It’s a journey well worth taking for any culinary enthusiast.

For those interested in delving deeper into the science and practice of tenderizing meat, reputable sources such as the American Meat Science Association provide a wealth of information. Additionally, culinary experts like Harold McGee offer insights into the chemistry of cooking, which can further enhance one’s understanding and skills in the kitchen.

In the realm of cooking, the ability to tenderize a tough cut of meat is a skill that reflects both the science of the craft and the artistry of the chef. It’s a skill that pays homage to the ingredients, respects the palate, and ultimately, transforms the dining experience.

Continue Reading

Ingredients

Can you Replace Whole Vanilla Beans with Vanilla Bean Powder? Our Taste Test

Published

on

By

There is a surprisingly wide range of vanilla extracts, vanilla powders, vanilla beans, and vanilla pastes available on the market. You may have wondered whether you are better off using vanilla bean powder to substitute vanilla beans. We have tested them so that you don’t have to. 

Vanilla Bean Powder

Vanilla bean powder is made from whole vanilla beans which have been ground up. This makes it cheaper than buying whole vanilla beans. Vanilla bean powder is also much easier to use than whole vanilla beans. 

If you need to substitute one for the other in a recipe, use half a teaspoon of vanilla powder to replace two inches of vanilla bean. Whatever you are baking will come out with the same beautiful specks you would get from vanilla beans. 

Vanilla bean powder is not the same as vanilla powder. The vanilla powder works best when you do not want the vanilla to affect the color of the food. You might want your vanilla cake to come out white, sans specks. We learned this information after looking up everything.

We also learned that vanilla bean powder is like vanilla beans because its quality worsens the longer it is stored. This deterioration in quality affects both vanilla beans and vanilla bean powder. We learned that vanilla bean paste is a better substitute for whole vanilla beans than vanilla bean powder. 

We ended up investing in vanilla bean powder we found on Amazon. It cost $10 an ounce which is expensive but not as expensive as vanilla beans. Two vanilla beans cost nearly $20. It can take up to 8 vanilla beans to make an ounce of vanilla beans. 

The vanilla bean powder we ordered from Amazon smelled lovely. We went ahead and used one and a half teaspoons of vanilla bean paste to make blackberry bread. The recipe called for vanilla extract but I used the vanilla powder as a substitute. The results were not what I expected. 

The vanilla flavor was present but subdued. We were hoping to be wowed by the vanilla flavor. We were also hoping to see vanilla bean specks on the bread. There weren’t any specks. The bread took on a grey tint instead. Vanilla bean powder does not achieve beautiful specks or a strong vanilla flavor. Vanilla bean paste does that for me. 

But I might use vanilla powder if I was in a bind with no way to get some vanilla extract or vanilla bean paste. Besides baking, the vanilla powder might be nice for smoothies, oatmeal, or even coffee. 

Continue Reading

Trending